Dripping Face
Step 1:
Create a new document in Photoshop with the size of 900 × 660 pixels. Then open the background image that you downloaded earlier and drag it into the Document now.

Step 2:
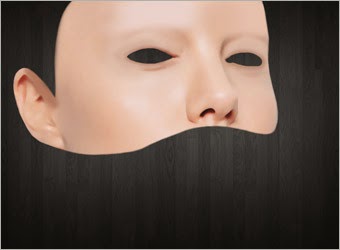
Open the image Angelina Jolie who also have you download earlier, and drag it into the Document. Then Crop (cut) the unwanted addition to the face with the help of PenTools or Lasso Tools. See Fig.

Step 3:
Make sure we are still in the Layer Face. Choose Filter> Blur> Surface Blur. Give the value of 5px on the Radius and Threshold Levels 8.
Create a new layer and name Cover. Use the Eye Dropper Tools and click on the eyelids. Then by using BrushTools remove the petals like feathers around the eye by means of paint. Use the Brush size of 25pt. Set Oppacity Cover Layer to 30%.

Step 4:
Using the Eraser Tools or the Pen Tools, Remove half of the face is curved. Delete the section of hair around the ears as shown.
Step 5:
This is the stage where you will make the face as if melted. It is called Dripping.
Create a new layer and name it Drips.
Use the Eye Dropper Tools and click on the face to change the foreground color as the color of the face. Then use the Brush Tools and paint from the bottom face downwards. Perform this step multiple times with different brush size.
Tip: Press the Shift key on the keyboard at the time of the painting towards the bottom in order to keep the lines straight.

Step 6:
Not to end there. In the Drip that you created, it still looks stiff because the angle is irrelevant. Then paint again on the section between the Drip Drip so the angle looks curved.
Then Select all the Drips Layer and Merge (combine Layer) with the name of Paint.

Step 7:
Right click on the Paint Layer and select Blending Options.
Put a check on the bevel and emboss. Set the style into the Inner Bevel, Depth to 165 Rate, Size to 50, Angle to 55, Altitude to 40, Screen Opacity down to 0%, Change Shadow Color to # DCA288, Shadow Opacity to 100% increase, and other settings that allow defaults.

Step 8:
Create a new layer with the name Glow.
Set the foreground color to white and the size of the Brush into 4pt. Create a path by using the Pen Tools as shown below.
Pen Tools make sure it is selected and right-click on your newly created path and choose Stroke Path. Then the ComboBox select Brush and check mark on Simulate Pressure. Then select Ok.

Step 9:
Duplicate (Copy) Glow Layer.
Make sure we are at the top Glow (Duplicate results) and select Filter> Blur> Gaussian Blur. Set the Radius to 3px.

Step 10:
Repeat steps 8 and 9 to make Stroke Glow other.
Glow focus only on the right side, which means that the light coming from the right position.

finishing:
Note on the cheeks of the face. I added a little touch of Glitter by using the Brush Tools. And the end result I also add emboss paper with the same effect.
Step 1:
Create a new document in Photoshop with the size of 900 × 660 pixels. Then open the background image that you downloaded earlier and drag it into the Document now.
Step 2:
Open the image Angelina Jolie who also have you download earlier, and drag it into the Document. Then Crop (cut) the unwanted addition to the face with the help of PenTools or Lasso Tools. See Fig.
Step 3:
Make sure we are still in the Layer Face. Choose Filter> Blur> Surface Blur. Give the value of 5px on the Radius and Threshold Levels 8.
Create a new layer and name Cover. Use the Eye Dropper Tools and click on the eyelids. Then by using BrushTools remove the petals like feathers around the eye by means of paint. Use the Brush size of 25pt. Set Oppacity Cover Layer to 30%.
Step 4:
Using the Eraser Tools or the Pen Tools, Remove half of the face is curved. Delete the section of hair around the ears as shown.
Step 5:
This is the stage where you will make the face as if melted. It is called Dripping.
Create a new layer and name it Drips.
Use the Eye Dropper Tools and click on the face to change the foreground color as the color of the face. Then use the Brush Tools and paint from the bottom face downwards. Perform this step multiple times with different brush size.
Tip: Press the Shift key on the keyboard at the time of the painting towards the bottom in order to keep the lines straight.
Step 6:
Not to end there. In the Drip that you created, it still looks stiff because the angle is irrelevant. Then paint again on the section between the Drip Drip so the angle looks curved.
Then Select all the Drips Layer and Merge (combine Layer) with the name of Paint.
Step 7:
Right click on the Paint Layer and select Blending Options.
Put a check on the bevel and emboss. Set the style into the Inner Bevel, Depth to 165 Rate, Size to 50, Angle to 55, Altitude to 40, Screen Opacity down to 0%, Change Shadow Color to # DCA288, Shadow Opacity to 100% increase, and other settings that allow defaults.
Step 8:
Create a new layer with the name Glow.
Set the foreground color to white and the size of the Brush into 4pt. Create a path by using the Pen Tools as shown below.
Pen Tools make sure it is selected and right-click on your newly created path and choose Stroke Path. Then the ComboBox select Brush and check mark on Simulate Pressure. Then select Ok.
Step 9:
Duplicate (Copy) Glow Layer.
Make sure we are at the top Glow (Duplicate results) and select Filter> Blur> Gaussian Blur. Set the Radius to 3px.
Step 10:
Repeat steps 8 and 9 to make Stroke Glow other.
Glow focus only on the right side, which means that the light coming from the right position.
finishing:
Note on the cheeks of the face. I added a little touch of Glitter by using the Brush Tools. And the end result I also add emboss paper with the same effect.