Making Cloud
Although Combustion is mostly used for explosion effects, you can also use it to create smoke and clouds. This tutorial teaches you how to create the cloud shown above in a matter of minutes.
From the Create menu choose Helpers, and select the Sphere gizmo from the Atmospherics rollout. Create a gizmo by dragging your cursor in your Perspective viewport. Check "Hemisphere". In my case the gizmo had a radius of 100 units. In your Front viewport shift-drag a copy of this gizmo along the y-axis. Now you have two gizmos stacked on top of each other. In my case, the second gizmo was positioned 5 units lower then the original one. Now you have to scale your gizmos first, to let them take the basic shape of a cloud. For the upper gizmo, I scaled the Z-axis by 70%. The second gizmo was scaled by 70% in both X-axis and Y-axis, while the Z-axis was scaled to 20% (Figure 1).
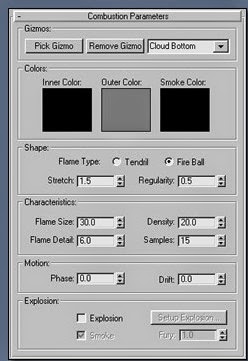
Now you've set up your gizmos, it's time to add some atmospherics. From the Render menu, click Environment and add a Combustion in the Atmospherics rollout. Assign the upper gizmo to this Combustion. Since you've squashed your gizmo a bit, it's wise to increase the Stretch value, to obtain properly shaped clouds. Leave the Phase and Wind settings as they are. You might want to mess with them later, if you're going to animate your cloud, but that's beyond the scope of this tutorial. As the other options of the Combustion rollout are pretty self-explaining, I won't go into the details here. Just adjust the setting to get something similar to this (Figure 2):
Add another Combustion and pick the lower gizmo. This Combustion will represent the shadows of your cloud. Therefore choose darker colors. Adjust the other settings to resemble the values in the picture below (Figure 3).
Now press the render button. Remember that combustion only works in non-orthogonal viewports, such as the Perspective viewport and any Camera viewports. Now the result doesn't look good, does it? That's because the two Combustions are ordered incorrectly. Choose the lower one, and press "Move Up" (Figure 4). Now render again. That looks better!
Now it's up to you to make your own unique clouds. Mess with the Colors, Density, gizmo sizes and Seed value of the gizmos to obtain the results you want. Beware though: Combustion was originally intended for fiery effects, and this causes them to "glow" a bit. Therefore Combustion won't work well for 'clouds at night' and dark thunderclouds.
Hopefully this simple tutorial was useful to you.
Although Combustion is mostly used for explosion effects, you can also use it to create smoke and clouds. This tutorial teaches you how to create the cloud shown above in a matter of minutes.
From the Create menu choose Helpers, and select the Sphere gizmo from the Atmospherics rollout. Create a gizmo by dragging your cursor in your Perspective viewport. Check "Hemisphere". In my case the gizmo had a radius of 100 units. In your Front viewport shift-drag a copy of this gizmo along the y-axis. Now you have two gizmos stacked on top of each other. In my case, the second gizmo was positioned 5 units lower then the original one. Now you have to scale your gizmos first, to let them take the basic shape of a cloud. For the upper gizmo, I scaled the Z-axis by 70%. The second gizmo was scaled by 70% in both X-axis and Y-axis, while the Z-axis was scaled to 20% (Figure 1).
Fig. 1 - The Hemisphere gizmos
Now you've set up your gizmos, it's time to add some atmospherics. From the Render menu, click Environment and add a Combustion in the Atmospherics rollout. Assign the upper gizmo to this Combustion. Since you've squashed your gizmo a bit, it's wise to increase the Stretch value, to obtain properly shaped clouds. Leave the Phase and Wind settings as they are. You might want to mess with them later, if you're going to animate your cloud, but that's beyond the scope of this tutorial. As the other options of the Combustion rollout are pretty self-explaining, I won't go into the details here. Just adjust the setting to get something similar to this (Figure 2):
Figure 2 - First Combustion rollout
Add another Combustion and pick the lower gizmo. This Combustion will represent the shadows of your cloud. Therefore choose darker colors. Adjust the other settings to resemble the values in the picture below (Figure 3).
Figure 3 - Second Combustion rollout
Now press the render button. Remember that combustion only works in non-orthogonal viewports, such as the Perspective viewport and any Camera viewports. Now the result doesn't look good, does it? That's because the two Combustions are ordered incorrectly. Choose the lower one, and press "Move Up" (Figure 4). Now render again. That looks better!
Figure 4 - Combustion order
Now it's up to you to make your own unique clouds. Mess with the Colors, Density, gizmo sizes and Seed value of the gizmos to obtain the results you want. Beware though: Combustion was originally intended for fiery effects, and this causes them to "glow" a bit. Therefore Combustion won't work well for 'clouds at night' and dark thunderclouds.
Hopefully this simple tutorial was useful to you.


