Magnifying Glass Effect
 With CorelDRAW X5, version below also. Create a magnifying glass effect in CorelDRAW there are actually a variety of ways, but here we will make it the right way that is in accordance with the features provided to make the enlarged object in certain parts, which we will discuss is to make the effect as shown on the right;
As for how to make it as follows;
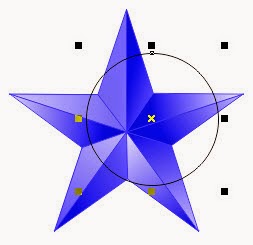
we first create an object, it's up to you, what object would be enlarged, here I made a star object, as shown below;

Create a circle object using the Rectangle tool in the Toolbox, place it in any place that will be compared as a magnifying glass;
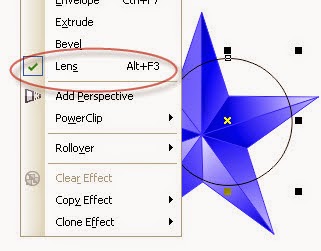
The next step, circular object in the selected state / active on the Menu Bar -> Effects -> select the Lens
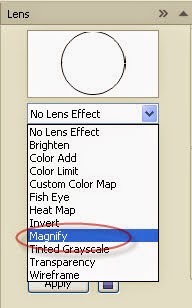
So it appears Docker box that is located on the right side of our monitor display, and select Magnify the Drop down;
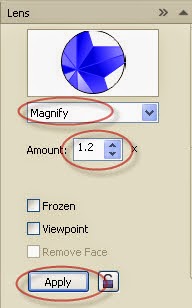
In the Amount type the number = 1.2, and click Apply
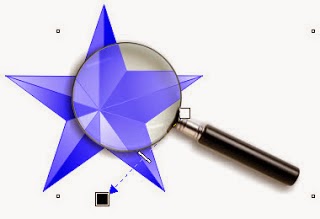
The results are as shown below, because later given additional images lop it should grass mark (tick) in the Frozen which aims to create a new object then click Apply;

In addition in order to give a realistic picture we looked lop image above (looking on the internet a lot, try to find free images to be safe) for lop width equal to the circumference of a circle object;

Give a shadow effect with Drop Shadow tool in the Toolbox;
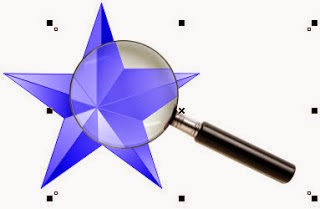
The end result as shown below, good luck.
With CorelDRAW X5, version below also. Create a magnifying glass effect in CorelDRAW there are actually a variety of ways, but here we will make it the right way that is in accordance with the features provided to make the enlarged object in certain parts, which we will discuss is to make the effect as shown on the right;As for how to make it as follows;
we first create an object, it's up to you, what object would be enlarged, here I made a star object, as shown below;
Create a circle object using the Rectangle tool in the Toolbox, place it in any place that will be compared as a magnifying glass;
The next step, circular object in the selected state / active on the Menu Bar -> Effects -> select the Lens
So it appears Docker box that is located on the right side of our monitor display, and select Magnify the Drop down;
In the Amount type the number = 1.2, and click Apply
The results are as shown below, because later given additional images lop it should grass mark (tick) in the Frozen which aims to create a new object then click Apply;
In addition in order to give a realistic picture we looked lop image above (looking on the internet a lot, try to find free images to be safe) for lop width equal to the circumference of a circle object;
Give a shadow effect with Drop Shadow tool in the Toolbox;
The end result as shown below, good luck.