Creating Lightning Effects with CorelDRAW
which we will discuss here only the emphasis on the trick just about how to make a lightning effect for spectacular lightning and fierce-mighty or later
created yourself, such as a example in the figure below we are going to give the effect of lightning;

Create an irregular line with the Freehand tool, how to click and drag the slider at will hold you ...

Set the line thickness to press F12 on the keyboard, replace the white color, press Ctrl + Shift + Q one by one, or group them according to the thickness line first and then the Combine, then after the Ctrl + Shift + Q Weld click on the Property Bar to unify all objects

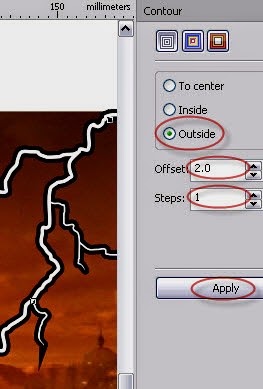
Furthermore, on the Menu Bar select Effects -> countour ..., at Docker fairy mark on the Outside Steps: 1 and click Apply
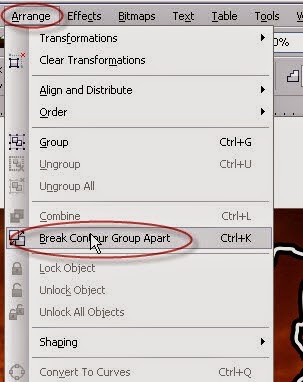
Click on the Menu Bar then Arrange -> Break Contour Group Apart (Ctrl + K)
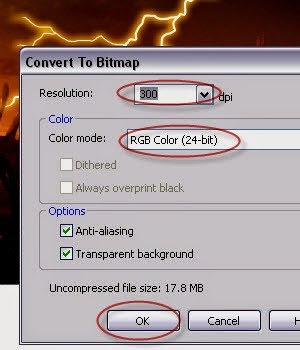
So as to create a new object that is a rather large, then give a yellow color and give the Blur effect on the Menu Bar -> Bitmaps -> Blur -> Gaussian Blur ... (because affective blur in CorelDRAW only for the Bitmap object must be in the Convert To bitmap ... first !!!)

Thus be as shown below

Furthermore, the selection of both the object and Convert To Bitmap ...
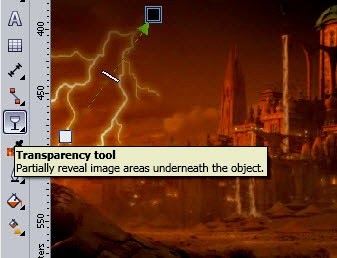
Give little effect Transparency
The results are as shown below, pretty, should not be too terrible .....

Once again you make yourself powerful, perhaps a bit difficult the important trick as above tutorial ....
which we will discuss here only the emphasis on the trick just about how to make a lightning effect for spectacular lightning and fierce-mighty or later
created yourself, such as a example in the figure below we are going to give the effect of lightning;
Create an irregular line with the Freehand tool, how to click and drag the slider at will hold you ...
Set the line thickness to press F12 on the keyboard, replace the white color, press Ctrl + Shift + Q one by one, or group them according to the thickness line first and then the Combine, then after the Ctrl + Shift + Q Weld click on the Property Bar to unify all objects
Furthermore, on the Menu Bar select Effects -> countour ..., at Docker fairy mark on the Outside Steps: 1 and click Apply
Click on the Menu Bar then Arrange -> Break Contour Group Apart (Ctrl + K)
So as to create a new object that is a rather large, then give a yellow color and give the Blur effect on the Menu Bar -> Bitmaps -> Blur -> Gaussian Blur ... (because affective blur in CorelDRAW only for the Bitmap object must be in the Convert To bitmap ... first !!!)
Thus be as shown below
Furthermore, the selection of both the object and Convert To Bitmap ...
Give little effect Transparency
The results are as shown below, pretty, should not be too terrible .....
Once again you make yourself powerful, perhaps a bit difficult the important trick as above tutorial ....