In this Photoshop tutorial I will explain what is meant layer or layers, in Photoshop. Layers is a layer that serves as the object, can be described as canvas or layer ...
With the Layers, allowing you to edit an object without disturbing other objects For example, if you are editing an image 1 then image 2 will not be affected.
You can adjust the composition of the layers by changing the attributes and the sequence of layers. In addition, special features such as adjustment layers, fill layers, and layers styles can be applied to give special effects to the layers.
Layers containing the objects so that each object can be edited without affecting other objects. When you give a certain effect (layer style) on a layer, then you can duplicate the layer style to another layer with the same style and shape.
For more details on setting the layer in photoshop, please see the picture on the Layer Properties below:
Here is a description of the Layer Properties and functions - functions:
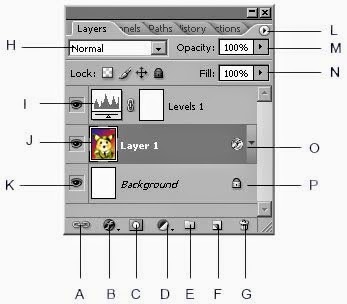
A. Link
Used to make in order to group multiple layers at once. How to use it by selecting the names of the desired layer (Shift + Click), and then click this icon.
B. Layer Style
Used to create a layer that functions as the menu Layer> Layer style.
C. Add a Layer Mask
Used to cover / protect some / all layers of the image editing process.
D. New Adjustment Layer
Used to create a layer that serves as a color conversion. The difference when using the menu Image> Adjustments can read this tutorial article.
E. Layer Group
Used to group multiple layers into a set of layers, in order to facilitate work processes that use a lot of layers.
F. New Layer
Used to create a new blank layer, or to create a duplicate layer. To create a duplicate layer, do by shifting the layer name to this icon.
G. Delete Layer
Used to remove the layer. Activate the layer you want to delete, then click this icon. In Photoshop CS2 version, can also be done simply by activating the layer and press the Delete key on the keyboard (this can not be done if you are using a previous version of Photoshop).
H. Layer Blending Option
Used to set the process that occurs in the pixels on the layer to the layer that is the position are below.
I. Image Adjustment Layer
It shows an image layer which is the color settings.
J. Layer Thumbnail
This is a thumbnail view of your original image. If the layer is a paper or text, then image zoom is a capital T.
This layer also indicates that this layer is the layer that is active or selected. The active layer will have a different color to the layer that is not active.
Each layer can have a name that is different. By default, Photoshop will create a layer with a sequential number. Name this layer can be changed by clicking on the name of the layer 2 times, then you just type in the desired name.
But when to click 2 times, to be precise on the layer name, because if not, then we just go to the Layer Style settings. If you click 2 times performed on the text layer thumbnail, then we will immediately make a block on the text layer.
You can also select the layer by right-clicking on the layer thumbnail then choose Layer Transparency. Or by doing a Ctrl + click on the layer thumbnail.
K. Eye Ball / Visibility
Used to set about performing or not a layer you're working with Photoshop. Way of life, by clicking on the icon.
L. Palette Menu
This icon is used to display the palette menu options. This palette menu palette associated with the function that you are currently viewing.
M. Opacity
Used to set the level of transparency of the layer. The smaller the percentage, the screen / image you will be more transparent.
N. Fill Opacity
Used to set the level of transparency of the layer. But not the same as Opacity, because it does not set the Fill section is a Layer Style. So Fill This option can be useful if you also apply the Layer Style.
O. Layer Style option
Figure F on the layer icon indicates that this layer contained in the Layer Style effects, while the image on the right triangle is used to show whether or not the detailed information used Layer Style.
P. layer Locked
Padlock icon images (key point) indicates that the layer is in a locked condition. Usually images with jpg extension will have a background layer which is always locked. To unlock the background layer is, how to perform click 2 times on that layer, and then click OK in the dialog box that appears.
With the Layers, allowing you to edit an object without disturbing other objects For example, if you are editing an image 1 then image 2 will not be affected.
You can adjust the composition of the layers by changing the attributes and the sequence of layers. In addition, special features such as adjustment layers, fill layers, and layers styles can be applied to give special effects to the layers.
Layers containing the objects so that each object can be edited without affecting other objects. When you give a certain effect (layer style) on a layer, then you can duplicate the layer style to another layer with the same style and shape.
For more details on setting the layer in photoshop, please see the picture on the Layer Properties below:
layer Properties
Picture: Layer Properties
Here is a description of the Layer Properties and functions - functions:
A. Link
Used to make in order to group multiple layers at once. How to use it by selecting the names of the desired layer (Shift + Click), and then click this icon.
B. Layer Style
Used to create a layer that functions as the menu Layer> Layer style.
C. Add a Layer Mask
Used to cover / protect some / all layers of the image editing process.
D. New Adjustment Layer
Used to create a layer that serves as a color conversion. The difference when using the menu Image> Adjustments can read this tutorial article.
E. Layer Group
Used to group multiple layers into a set of layers, in order to facilitate work processes that use a lot of layers.
F. New Layer
Used to create a new blank layer, or to create a duplicate layer. To create a duplicate layer, do by shifting the layer name to this icon.
G. Delete Layer
Used to remove the layer. Activate the layer you want to delete, then click this icon. In Photoshop CS2 version, can also be done simply by activating the layer and press the Delete key on the keyboard (this can not be done if you are using a previous version of Photoshop).
H. Layer Blending Option
Used to set the process that occurs in the pixels on the layer to the layer that is the position are below.
I. Image Adjustment Layer
It shows an image layer which is the color settings.
J. Layer Thumbnail
This is a thumbnail view of your original image. If the layer is a paper or text, then image zoom is a capital T.
This layer also indicates that this layer is the layer that is active or selected. The active layer will have a different color to the layer that is not active.
Each layer can have a name that is different. By default, Photoshop will create a layer with a sequential number. Name this layer can be changed by clicking on the name of the layer 2 times, then you just type in the desired name.
But when to click 2 times, to be precise on the layer name, because if not, then we just go to the Layer Style settings. If you click 2 times performed on the text layer thumbnail, then we will immediately make a block on the text layer.
You can also select the layer by right-clicking on the layer thumbnail then choose Layer Transparency. Or by doing a Ctrl + click on the layer thumbnail.
K. Eye Ball / Visibility
Used to set about performing or not a layer you're working with Photoshop. Way of life, by clicking on the icon.
L. Palette Menu
This icon is used to display the palette menu options. This palette menu palette associated with the function that you are currently viewing.
M. Opacity
Used to set the level of transparency of the layer. The smaller the percentage, the screen / image you will be more transparent.
N. Fill Opacity
Used to set the level of transparency of the layer. But not the same as Opacity, because it does not set the Fill section is a Layer Style. So Fill This option can be useful if you also apply the Layer Style.
O. Layer Style option
Figure F on the layer icon indicates that this layer contained in the Layer Style effects, while the image on the right triangle is used to show whether or not the detailed information used Layer Style.
P. layer Locked
Padlock icon images (key point) indicates that the layer is in a locked condition. Usually images with jpg extension will have a background layer which is always locked. To unlock the background layer is, how to perform click 2 times on that layer, and then click OK in the dialog box that appears.